
I have been seeing embroidered pegboard everywhere and I’ve been dying to do a large scale piece somewhere in my home. After stumbling upon a few inspirations, I decided to do a big entryway sign with hooks to hang by my back door. I never use the front door and there is no closet near the back so this would provide a fun piece of art and a place to hang my coat at the end of the day.

This one did take a while plan but the project when fast. Since I’ve already done the hard part for you, you have no excuse not to give this one a try! Here’s what you’ll need to recreate this gem.
Things You’ll Need
20” x 30” Pegboard
1” x 2” Pine Board – 8” long
1” x 4” Pine Board – 3” long
5 Small Metal Hooks
Paint
Yarn
Wood Glue
Frame Materials – List and instructions found here
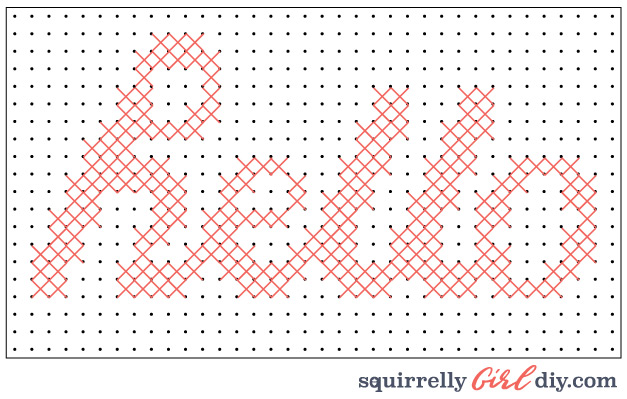
I had found a cute hello welcome hook board featured on Apartment Therapy and knew this is the way I wanted to incorporate pegboard embroidery into the house. First major change was that I wanted a script hello instead of blocks. I tried to figure out the best way to translate it to pegboard and then I found this great sign on Magic City Thistle. The look she had was perfect but it was too large. After much trial and error, I sized it down to fit on the space I had. Here is the pattern all worked out for you! Click here to download the pattern.
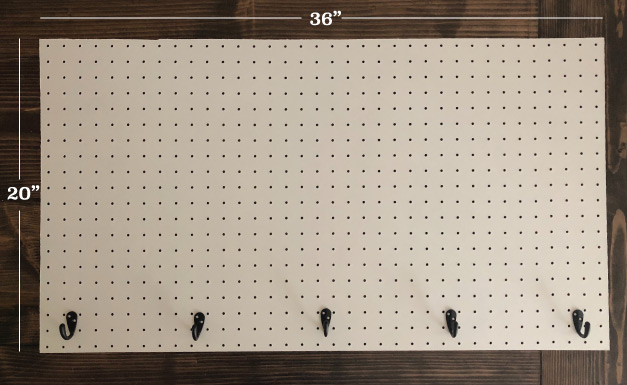
Now that the planning is done, it was time to start crafting! I started with a 2’ x 4’ piece of pegboard and cut it down to 20” x 30” to fit my wall. When you do this, make sure you are marking your measurements between the holes. You don’t want to cut through the holes or your edges will be messy. I will also throw off the number of holes you have to embroider in so the pattern will probably not match up. I painted mine white for a nice neutral background but pick whatever colors work best with your interiors. I did layout my hooks along the bottom to make sure I had the correct amount. I got smaller hooks so 5 was perfect but I could see doing less if you got a larger hook.
Next is time to start embroidering! I used scrap yarn I had laying around that wasn’t very thick so I doubled it up to fill it out more. A specialty, thicker yarn would be really fun for this project too but I just wanted to use up what I had. Tie off a large knot on the end of your yarn and start from the back. You’ll see on the pattern that I left 3 rows of holes along the bottom for the hooks and one row of holes along the three other sides. Double check your starting point because it’s the worst to get halfway through a project like this and realize the whole thing is off by a few holes. I often did a line of them in one direction and came back and did the cross on my way back. That seemed to help me keep count of the pattern. I also had a printed copy of the pattern in front of me to mark off what I’ve done. Just take your time and follow the pattern.

Once your all done with the embroidering, it’s time to add some stability to this sign. Peg board is kind of flimsy on it’s own so I knew I would need to add some support to it before attaching the hooks to it. I ran a 1” x 4” across the bottom length of the board and 1” x 2” around the remaining edges. The thicker board along the bottom is so I have something soiled to attach the hooks to. Attach the boards with a good quality wood glue and make sure you clamp them until they dry. You may notice some wood glue filling in some of the pegboard holes after you apply the clamps. Just take a wet q-tip and removed the extra glue.

Layout your hooks so they are evenly distributed along the bottom and attach with screws that came with he hooks. I finished the sign off by attaching a wooden frame. This is the same style that I use on my canvas art and you can find instructions for them here. The only difference is that I did add a few nails around the outside to attach the frame to the sign. I wanted to make sure it was secure since people would be hanging things on it. I used 4” long screws to attach the sign to the wall, drilling them directly into studs. I did a screw in each corner so I don’t think this thing is coming off the wall any time soon!

I am so in love with this sign & it turned out exactly how I wanted! I love that you could change out colors and get a totally different looking sign. The possibilities are endless but the result will always be great! Enjoy!


